Oils for engines are utilized in a range of industries across the globe, like logistics, passenger cars, transport, and agriculture. Oils play a crucial role in the preservation of engines and the maintenance of vehicles and ensure that your vehicle runs at its peak for a long time. The engine oils used within engines provide lubrication for the diverse moving components to reduce friction, wear and tear. The testing and analysis of engine oil is similar to the testing of blood samples taken in a laboratory and can give an extensive and comprehensive diagnosis of the state of the engine, which can help to determine the degree of wear and tear, etc. Regular engine oil sample tests make it possible to identify potential issues to prevent unnecessary downtime and ensure that the engine is at its best.

Atlas Lab provides a comprehensive high-tech Engine testing and analysis service. We analyze the engine oils under the top world-class specifications like ASTM (American Society for Testing and Materials), ISO – American Society for Testing and Materials, ISO – International Organization for Standardization, and ISO – International Organization for Standardization. The tests conducted to test Engine oil include Viscosity water, oxidation, PQ Index, Total Acid Number, Total Base Number, etc. Testing for engine oil is conducted by specialists in the area of analysis and testing with more than 40 years of combined knowledge to give you the most accurate outcomes for all your Engine oil-related concerns. Atlas Lab provides a complete engine oil solution which provides fast and precise tests at an affordable rate to our customers worldwide.
Engine Oil, Check!
Check the owner’s instruction manual, and adhere to the automaker’s suggestions. Some newer models include an electronic oil gauge and a non-traditional dipstick for manual inspections.
If you’re doing the check yourself, be sure your car is on a level surface as well; in the case of most vehicles and engines, the engine must be excellent to ensure that you don’t risk burning yourself by touching a hot engine component. (For some vehicles, checking the oil when the engine is heated up is recommended.) After turning off the engine, close your car’s hood and look for the dipstick. Take the dipstick away from the engine and clean the oil from the end. After that, insert it back into the tube and push it back inside.
Take it out again, then look on every side to find the location of the oil at the bottom. Every dipstick is equipped with some method of marking the appropriate oil level; it could be two pinholes, the letters “L and H” (low and high) or the abbreviations MAX and MIN or simply a region of crossed-hatching. The level is acceptable if the highest point part of an oil “streak” lies between two marks or inside that cross-hatched zone.
However, if your oil falls below the minimal mark, it is necessary to supplement it according to the following procedure.
Car Maintenance Myths
There needs to be more information about maintaining your vehicle’s performance. In”Consumer 101,” the “Consumer 101” television show, the host, Jack Rico, learns from Consumer Reports expert Jon Linkov the truth behind several of the most significant maintenance misconceptions.
What colour should my motor oil have?
If you get a brand-new oil bottle, the colour will change to transparent and golden, which looks similar to syrup (although you shouldn’t add it to pancakes).
In an engine, oil can rapidly change to a dark brown, which could be alarming. This is normal, but it doesn’t mean that something is going on with your engine.
What is the best time to check my oil levels?
Manufacturers advise replacing your engine oil at least every 12 months or every 9000 miles, whichever is earlier. However, you must inspect your engine oil regularly to ensure your vehicle remains safe to operate.
Check the level of your oil at the time your engine is running cold. Take a minimum of 10 minutes after using before making sure you have the correct reading. Also, don’t risk burning yourself with the hot engine.
MOT checklist, including a complete guide
Learn how to check the pressure of your tyres using a video
12 easy car maintenance checks you need to be competing

6 Steps For Checking Your Oil
What’s the best way to test the oil in your car? Here’s a quick six-step guide.
Step 1: Prepare to Check
Ensure that your car is properly parked without the engine running, the transmission on Park (or manually on the lower gear), and the parking brake in. The hood should be lifted. If you need help with the best way to accomplish this, check out the manual of your vehicle’s owner.
A majority of cars have a hood-release lever that is located beneath the instrument panel to the left. Additionally, there’s a safety catch just under the front edge of the hood, which must be unlocked before raising the hood.
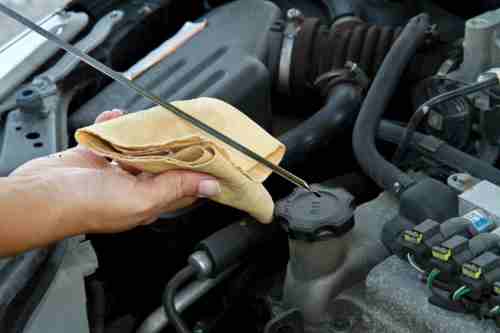
Step 2: Locate the Dipstick
Car, Land Vehicle Car Engine, Auto Part, Hood, Automotive Exterior Part of the engine in an automotive vehicle
The dipstick found on most vehicles is easily identifiable since it comes in a small-handled colour, typically orange or yellow. The handle is marked with an oil-can sign.
Step 3: Pull the Dipstick
Remove the dipstick entirely from the tube it is housed in. This is similar to the sword being pulled out of its sheath. Get a paper or a rag towel at hand, and wash any remaining oil off the edge of your dipstick. Near the end of the dipstick, you’ll notice two lines. The lower one signifies the level of oil is 1 quart below. The second line signifies the crankcase (the engine’s tank) is filled. Certain dipsticks can also be identified with “full” or “add.”
Step 4: Note Oil Level
Inject the dipstick into the tube gradually and press it to the bottom. Remove it, then examine the point, and you should see oil. If the amount of oil is in between these two lines, your car can handle the load. If it’s below the lower mark or even below, then it’s time to add one-quarter of a quart.
Step 5: Wait and Recheck
Hood, Automotive Exterior auto part, hand vehicle, the door of the vehicle Auto, Window of Automotive part, Windshield maintenance,
GETTY IMAGES
After you’ve added a quarter-cup of oil, you’ll need to wait a few minutes for the oil to run down the engine’s crankcase. Then, recheck the level, making sure that the level remains somewhere between the low and high marks. It doesn’t necessarily have to be near the highest mark to allow the engine to get enough fluid to function safely.
What If I Don’t Have A Dipstick?
There’s a reason to note that certain modern vehicles do not have dipsticks to check the oil level. Instead, an electronic sensor within the oil pan is used to monitor the oil level. The information will not be shown on the standard central console or dashboard, usually hidden away within a sub-menu of your operating system. The quickest way to discover the information is to consult your user manual. It will provide instructions on how to bring the correct display.
How To Add Motor Oil
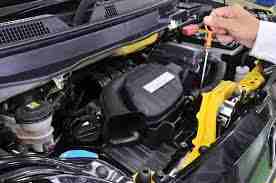
The oil cap is usually situated at the top of your engine. It will show an oil can symbol. The cap must be removed cap and attached to the oil filler to pour the engine oil. Fill the tank about a half-quart in a row, and make use of a funnel to ensure that there is no spillage. While filling up the oil, make sure you don’t add excessive amounts can be as harmful as not having enough.
Once you’ve added some oil, let it settle for about a minute before checking your dipstick. If your level remains lower, add the remainder of the quarter of a quart. Most of the time, there is only a need for this if you decide to do the amount slowly so that you use less.
After your oil is at an appropriate level, put the cap back in the correct position. Check for spills and clean up any spills if needed. Shut off the hood, and you’re good to start.
In terms of the exact kind of oil you should use, the grade of oil the manual for your vehicle recommends. The majority of the time, it could be 5W-30 or 10-W-40. However, there are alternatives. Certain vehicles, specifically sports cars, need special synthetic oils. Others can be used with any oil of the right quality.
It is recommended to check your oil on a regular basis to keep your engine in a good state of repair. No matter how good the oil appears, it is essential to adhere to the manufacturer’s guidelines for oil filter replacement. What you want to avoid is for your filter to leak a lot of dirt into your oil.
How to Add Oil: Step by Step
- Determine the type of oil that is recommended by the owner’s guidebook
- Check that your vehicle’s engine has been shut off and that the vehicle is on a level surface
- Unzip the car’s hood
- Remove and locate the cap that fills up with oil. It is typically located at the top of the engine.
- Incorporate about half a quart of oil
- Take a few minutes, then check the level of your oil and again.
- Add another quart of oil if the oil level still needs to be high.
Summary
Regular inspections of your oil are essential for your vehicle’s health and long-term performance. If you keep an eye on your oil, you’ll be able to be sure it’s always top-up and in good condition. Checking your oil is effortless, even if not a mechanical expert and anyone can do this automotive maintenance task.