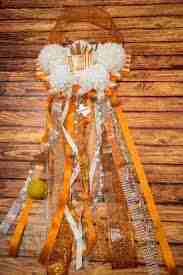
Mums are ornamental pins worn for immoderate college homecoming activities, which are probably generally pinned at a woman’s chest and grasped right down to any duration, typically ranging from the waist to the knee. These complicated creations are easy and extremely fun to make. Gather some problem decorative trinkets and sparkly embellishments you need and discover ways to make your very personal custom-designed mums with the ones easy to conform with steps.
DIY Homecoming Mum Supplies
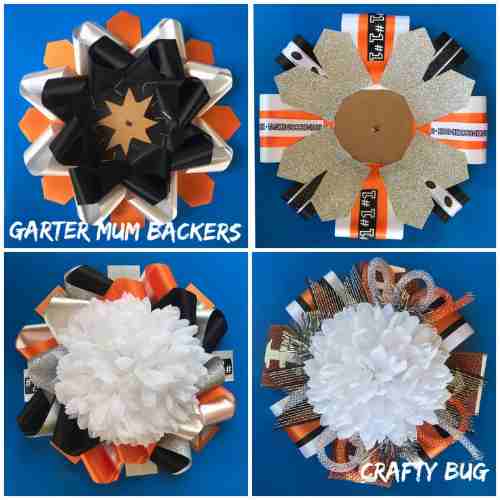
A homecoming mum is mainly an element, the mother (or mums) on the pinnacle, after which all ribbons are placed down. You have been given a few alternatives when it involves making your own DIY homecoming mum. You can start genuinely from scratch, or you should buy a form of a base mum; that is what I’ve performed right here. That way, it comes with some sturdy ribbons and already has the mums and the top with ribbons across the mums. But of direction, this is simply the bottom.
To the bottom sturdy color ribbons, you’ll need to feature texture and personalization. Braided ribbons, loop ribbons, heart ribbons, and container ribbons are all clean to DIY and upload on your mum.
DIY Homecoming Mum Assembly
It’s traditional to characteristic ribbons with stickers indicating your commencement 12 months, your call, your dates call, and your college call. Staple all of your additional ribbons on top of the sturdy color ribbons that make up the base of your mum.
You don’t want to be confined to actual ribbons. Strands of feathers are well-known to feature in a mum. So are bells, whistles, and all varieties of noisemakers. These are all stapled at the side of your DIY ribbons.
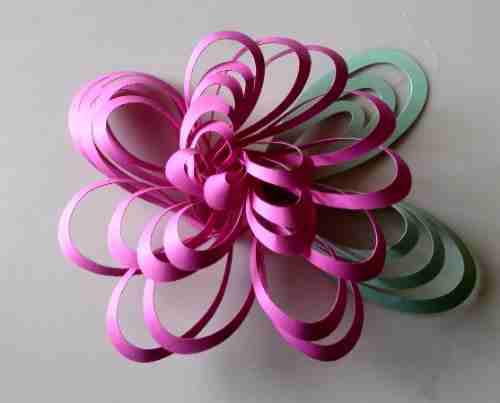
Once your ribbons are all in place, you need to customize the mother vegetation on the top. Teddy bears are a conventional choice, but you could also need to characterize your school mascot.
Here the university mascot is an owl, so now, not great did I add a silver owl (a wood silhouette that I painted silver and delivered silver letters); however, I also have the teddy endure preserving a small owl.
You can add lettering, like the ‘homecoming’ word at the pinnacle. These are all warm glued onto the mums.
HOW TO MAKE A HOMECOMING MUM
- 12 yards #16 ribbon in Color #1 (2-inches giant)
- eight yards #sixteen ribbon in Color #2 (2-inches great)
- 3 yards #nine ribbon in Color #1 (1.25-inches large)
- 4 yards #nine ribbon in Color #2 (1.25-inches significant)
- five yards #3 ribbon in Color #1 (3/eight-inches tremendous)
- 5 yards #three ribbon in Color #2 (3/8-inches big)
- Accent ribbons and accessories in 1-outdoor length
- Cardboard Mum Backing (must consist of 3 layers)
- Large Mum Flower
- Quality Stapler (This is so critical!)
Measuring Tape
Begin by using assembling the loops for your mum’s backing. Cut eight gadgets of #16 ribbon, which can be 6 inches prolonged in Color #2. Cut 8 sets of #9 ribbon, probably 6 inches extended in Color #1.
Lay one set of every color ribbon on top of every distinctive and fold to create a loop—a staple on one stop. Repeat for the final 7 quantities.
Staple 4 loops throughout the mum backing using the middle circle as a manual to ensure the ribbon is targeted. You want one at each factor to create a move.
Add the 4 final loops to the backing in the areas of a number of the others. Again, use the middle circle to ensure the ribbon is targeted.
Now it’s time to characterize the elements. Cut eight quantities that might be 6 inches long in #9 ribbon in Color #1. Then lessen 8 portions which are probably 6 inches lengthy in #5 ribbon in Color #2.
Layer the ribbons like earlier, folding them vertically to create a thing—a staple in location.
Fill in the gaps in the various loops for your cardboard backing with the elements. These will elevate a piece and deliver the backing a few lengths.
. You’ll need 17 loops to shape the phrase, leaving clean loops on the start and prevent.
Cut 17 portions of #16 ribbon in Color #1 which can be 6 inches extended. Then lessen 17 quantities of #9 ribbon in Color #2, which may be 6 inches prolonged. You’ll also need a bit of #16 ribbon in Color #1, that is, 1 backyard extended.
Layer the ribbon and loop the ends together as we did in the first step. Staple the ends collectively.
Attach the loops to the 1 outdoor ribbon using staples. Work from the lowest to the top, ensuring that each loop overlaps the only underneath it and hides the staples.
Cut the last ribbon into 1 prolonged door portion, collectively with any accessory ribbon or trinket strings you obtain.
Start assembling the streamers by stapling them to some other cardboard backing sheet under the circle establishing.
You want a base layer of #sixteen ribbons on your colorations, overlapping each unique and alternating coloration. Add some accessory ribbons on the pinnacle.
Cut the #three ribbons into 1-outside portions and add them on top.
Cut small quantities of ribbon for the neck strap and staple it onto the top. The pieces will tie together to permit the mom to draw close to the neck.
Add warm glue onto the front of your loops and factors backing, then area the mum flower onto it, stringing it via the open hole.
Glue that cardboard backing to the handiest with the streamers, then glue the last backing onto the once more to cowl the staples.
Now your mum can function with accents, letters, stickers, and trinkets! Hot glue them into the vicinity, and also, you’re finished!