When figuring out the issue at work, it can be challenging to use text. Do the trick. This is where screenshots can help. They are a snapshot of what’s on your screen. This is helpful to share with others. You’ve found the correct place if you’re trying to capture pictures using your Windows 11 laptop. This step-by-step guide will guide you to the right path.
How do you capture a screen using a laptop?
Utilizing your keyboard is the most efficient method to take an image on the Windows 11 laptop. Hit the “Fn” and the “PrtSc” keys to open the Snipping Tool.
Your screen will dim before a menu will appear on the right. Starting from the left, there are options for rectangle, freeform, window, and full-screen.
In Rectangular Mode, pick any portion of the screen and then draw an outline of a rectangle around the area you’d prefer. What you need to do is press the mouse’s left click and drag your mouse until you’re satisfied with the dimension, then let it go.
Freeform Mode can be described as similar to its sense; you press the mouse’s left button to drag. But it is possible to create whatever shape you’d like.
Window Mode lets you capture a screenshot of a particular application. The region around the chosen window will be dark in outline. This will allow you to determine the window that is selected.
When you’ve completed the photo, After taking the screenshot, a pop-up notification will show on the right-hand side of the screen. This will let you edit or save your picture. If you turn off this notification, you may copy the image in a Word document or use a photo app.
How do you manually locate the tools for shipping
Hit the Windows button in the taskbar, and type the Snipping Tool in the open search bar. It will launch the Snipping Tool app, from which you can alter your preferences. Once ready for an image, click the “+ New” button at the top left. Press and hold the left mouse button. Place your cursor on the region you want to record, then let it go.
The Print Screen Button
You can find a Print Screen key that you can find on your keyboard. As the name suggests, the key prints the present screen on your laptop. If you have an electronic keyboard, it’s typically situated on the upper-right of your keyboard. If you’re operating a computer, you will find it at the top or bottom that runs across the top of your keyboard. The Screen for Print Screen could be displayed as Screen Print Screen and PrtSc.
1. Press the Print Screen key, and you’ll see a tiny menu at the top of the center of your computer screen.
2. Select the location you would like to take a picture of. The image will be saved on the clipboard. Naturally, you can choose one of the icons within the menu based on the need to take a screenshot.
3. Open an application such as Paint or Word and copy the image into it.
4. Edit the image or save it in an appropriate place.
The image will be saved into your clipboard. To keep the image, you need to paste the image into any application that permits the insertion of ideas, such as Microsoft Word or Paint.
A quick tip: You can open the clipboard to view the pictures you’ve captured by pressing the Windows button + V.
The Windows key + Print Screen
To take a Windows 10 and 11 picture and save the image in the Screenshots folder, use the Windows key and PrtScn. The screen will be dark, and a shot of the whole screen will be taken and saved in the appropriate folder.
An easy way to access the Screenshots directory is to open File Explorer (press the Windows key + E) and then click Pictures on the left screen (navigation pane). If you’ve got OneDrive activated, your screenshots will be stored there, too.
Alt + Print Screen
To capture only the current screen you’re in, hold Alt+ PrtScn. The image will be copied to the clipboard; you’ll need to drag it into another application to save it.
The Snip & Sketch tool in Windows 10
Windows 10 Snip & Draw is the ideal method to capture screenshots on Windows If you’re trying to edit, customize, and share screen images.
To enable Snip and Sketch, you can use your keyboard shortcut, Windows Key + Shift + S. The screen will turn dim, and a small menu will be displayed in the upper right-hand corner of the screen. It will allow for an elongated, free-form window or a full-screen image.
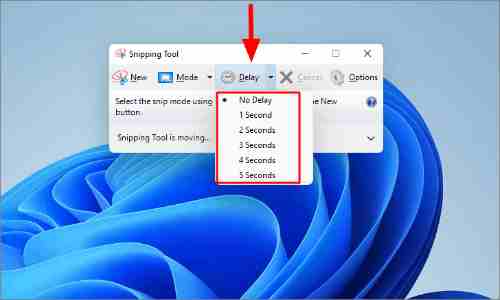
Add a Delay Timer to the Snipping Tool
If you’d like to utilize an interval timer before making a photo, enter Snipping into the Start menu, then launch the application window instead of using your keyboard shortcut. You will see the clock icon in the menu that pops up, and select to include the delay timer to 1, 3, 5, or 10 seconds before you snap a picture.
Use the Snipping Tool’s New OCR Feature
The Snipping Tool now offers optical character recognition (OCR) technology. That means all words appearing in images are identified as searchable. The OCR tool can copy the texts in pictures and automatically erase information like emails, names, and telephone numbers. The tool is accessible via the icon of a text page, which is shown below.
How to Take a Scrolling Screenshot
SnagIt, as well as many other screenshot applications from third parties, lets you create scrolling screenshots. This can be described as an image that auto-scrolled down to take areas of the idea that are lower than the visible portion. The most popular use of the scrolling screenshot is to display webpages. The native Windows 11 screenshot method cannot do this. However, Microsoft Edge and Firefox can. In Edge, click on a web page, click Web Capture, and choose Capture the entire Page.
Google Chrome allows images that scroll in a specific direction. However, you must modify a Developer Setting to get it. It’s simpler to download an extension such as Scrnli (though the truth is that I’m one of those extensions since they generally provide access to internet browsing).
Use PrtScn to Screenshot the Whole Screen
There are numerous methods to create screenshots with Windows 11; the most simple is to press the PrtScn (aka PrtSc) button on your keyboard. It captures your screen and multiple displays if you have them, and all windows are visible, including the taskbar Start button. It is then possible to insert the screenshot into any software that supports the image paste feature.
There are various ways of taking an image based on what you’re trying to capture and how you plan to preserve the image. The majority of methods will require the user to learn keyboard shortcuts. There’s an application built into Windows 11 to help with making screenshots.
Screenshot Part of the Screen
Win+Shift+S
The three buttons trigger a snipping tool that is better than PrtSc. You can still take screenshots of the entire screen. However, there are three additional ways to use it.
When you press the three keys, the screen will turn off, and a tiny menu will appear at the top of the screen. The menu has four keys to allow you to take various kinds of pictures. This is how you can use these buttons:
Rectangular Snip: You draw a circle that represents your desired image. The idea is to capture a small area of the screen (and leave the rest out).
Freeform Snip: Create a form that contains your desired information. This option is helpful if rectangular snips are too narrow to get your desired information.
Window Snip allows you to record a picture of an open window. It is similar to the rectangular snip but does not require a steady hand to capture the window you want; it automatically captures just one particular window with no taskbar, for example.
Fullscreen Snip: press the button to record the entire screen. The same thing can be done with PrtScr.
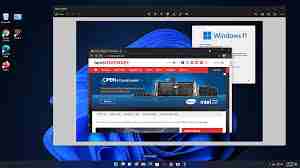
Windows 11 snip tool capturing calculator.
To prevent you from memorizing the shortcut, attach it with the PrtSc button to ensure that a similar menu will appear in a sequence whenever you push it. For this, you must open Settings and search for the printing screen. You can change the Press the Print Screen button selection for screen snipping.
When you have selected one of the alternatives, the photo is saved to your clipboard. You may copy and paste the image into your email program or any other application supporting pasted images.
If you choose the prompt in the screen’s lower right corner when you take the photo, it’ll appear inside the Snipping tool. There are tools for marking up, including a highlighter or pencil. Additionally, you can easily cut the picture to crop it further, print it, and save it as PNG, JPG, and GIF.
Tips for Taking Screenshots in Windows 11
- When an image is loaded into the Snipping Tool, use the crop tool to determine the portion you wish to preserve without recreating the screenshot.
- If the wallpaper on your desktop has patterns or colors, the wallpaper may show through on the screen. This can be avoided by setting your background to white.
- You can create an outline for the images you’ve taken using the Snipping Tool by navigating to the tool’s settings and then enabling Snip Outline. It is possible to select any border color you want.
- When your window screenshots must be of a particular length and width, then the no-cost Sizer tool will allow you to change the size of your window before taking the image.
- Screenshot apps could be used in place. Another reason to consider a separate application that can take screenshots is to have enhanced capabilities. Screenshot apps like this can take a picture of the entire webpage, which isn’t impossible to accomplish using the steps above.
What do I need to do to locate the tool for shipping
Select the Windows button in the taskbar, and type the Snipping Tool in the open search box. It will launch the Snipping Tool app, from which you can change your preferences. If you’re ready to capture an image, click the “+ New” button at the top left. Press the left mouse button. Please move your mouse over the location you’d like to take a picture of, then let it go.